Location -> News
News
Clamp on ultrasonic flow meter installation method
Email:sales01@cxflowmeter.com
The installation method of clamp-on ultrasonic water flow meter can be carried out according to the following steps to ensure that the installation process is clear and accurate:
1. Preliminary preparation
Check parameters:
Check the parameters of the installed pipe, such as pipe diameter, wall thickness, etc., to ensure that they match the requirements of the flow meter.
Use a tape measure to measure the circumference of the measured pipe and calculate the pipe diameter accordingly.
Select installation method:
According to the pipe diameter and actual conditions, select a suitable installation method, such as V method or Z method.
V method installation: Applicable to pipe diameters of DN15mm-DN400mm. During installation, the two sensors are horizontally aligned, and the center line is horizontal with the pipe axis.
Z method installation: Applicable to pipes with a diameter greater than DN100, especially when the pipe is thicker or there are suspended matter in the liquid. When the Z method is installed, the ultrasonic wave is directly transmitted in the pipe, and the signal attenuation is small.
2. Installation steps
Wiring:
Host part wiring:
Power supply wiring: According to the wiring diagram, select AC 220V or DC 24V power supply for wiring.
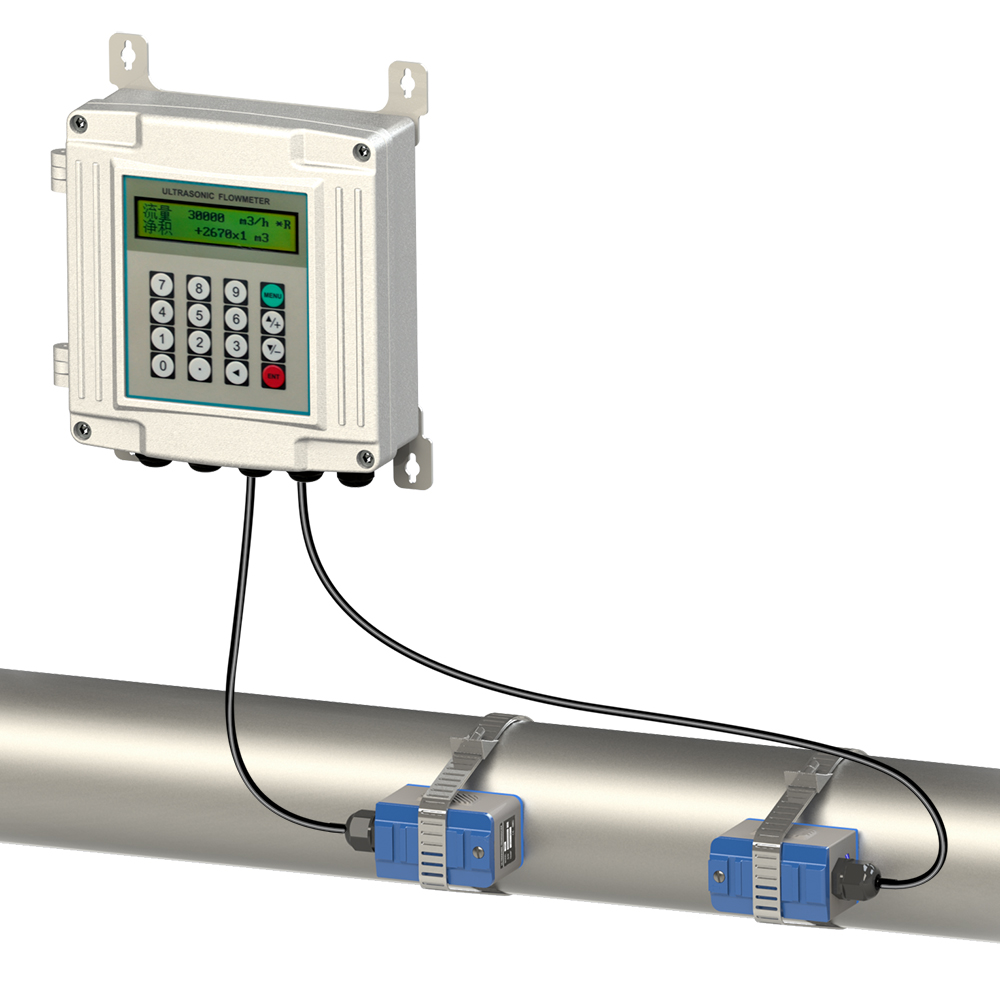
Sensor wiring: According to the wiring diagram provided by the manufacturer, connect the downstream probe and the upstream probe to the corresponding wiring terminals respectively.
Other wiring: such as 4-20mA current output, 485 communication, heat meter, relay switch quantity, etc., connect according to specific needs.
Probe part wiring: Usually only the +- terminals need to be connected, and the shielding wire is usually not connected.
Install the sensor:
Select the installation location: Make sure that the installation location is full of pipes and stable flow, away from pumps and elbows.
Polish the pipe: Use an angle grinder or coarse sandpaper to polish the area where the sensor is to be installed, remove rust, paint or anti-rust layer, and expose the metal nature of the pipe.
Apply coupling agent: Apply enough coupling agent on the sensor.
Install the sensor: Press the sensor against the pipe wall and fix it with a clamp (such as a stainless steel belt) to ensure uniform force. Note that there should be no air bubbles, gravel or other dirt between the sensor and the pipe wall.
Determine the installation distance:
According to the parameters set in the host menu, check the sensor installation distance and install the sensor according to this distance.
3. Debugging and inspection
Confirm the pipeline status:
Confirm that the liquid in the pipeline is full and check whether the pipeline status is normal.
Check the signal:
Enter the relevant window to check the transmission time ratio and ensure that it is within the normal range (such as 100%±3%).
Check the Q value of the upstream and downstream signal strength and signal quality to ensure that the signal strength and Q value meet the requirements (such as signal strength above 60 and Q value above 75).
Debug:
Perform necessary debugging according to the actual situation to ensure that the flow meter can work normally.
If you have other questions about ultrasonic water flowmeter, look forward to your consultation at any time:
Email:sales01@cxflowmeter.com
whatsapp:008618049841995
Last£º›]ÓÐÁË Next£ºHow to choose a vortex flow met..